Texturing is the process of applying images to 3D objects so that they appear more realistic. The process slightly differs depending on the Blender version used. This section builds on top of information found on the Materials page.
Contents
- For Blender 2.80 and newer
- For Blender 2.63 to 2.79
- Applying Textures
- Sources of Textures
- Vertex Coloring
- Decals
For Blender 2.80 and newer
Blender materials must be used in order to assign image textures to UV maps. Hence usage of the Material Properties section in Blender’s Properties window or Shader Editor window is crucial to being able to texture any mesh.
For Blender 2.63 to 2.79
Use UV texturing in Blender for your objects for them to appear in-game, but don’t waste time with Blender materials or cycles materials. They don’t get exported into the game—instead, use SuperTuxKart’s own materials system.
In fact, don’t even bother with the Texture section of Blender’s Properties window. Simply applying a UV map is enough.
Applying Textures
This entire process only works for Blender 2.80+. Skip this process if Blender <= 2.79 is being used.
Image texture configuration is now done on a per-material basis, as it is no longer possible to apply them directly to UV maps. It is also possible to assign an image to multiple textures, but only one image configuration will have any effect in-game. The material whose name ends with a later letter in A to Z manner is where the configuration will be taken from.
For basic single-image materials, configuration can be done entirely from the Properties window, though the Shader Editor window can be used at any time, and the latter has to be used for more complex configurations. The following two processs assume that the Material Output output node and Principled BSDF shader node are already added. If they not already there, they should be added and connected accordingly.
Recommended: In the Principled BSDF shader node, change Specular to 0, and Roughness to 1. This will change the appearance of a material to look more like what it will appear in-game, which is especially helpful when the Viewport Shading settings are set to use either Solid mode with the color set to Texture or Material Preview mode.
From the Properties Window
First, select the material that should be edited from the list at the top, or create a new one after adding a material slot. Go to the Base Color input, click on the yellow dot to the left of the color selector, and select Texture -> Image Texture. This should replace the color selector with an image selector, and it will now be possible to either use an already-loaded image or to open another one.
Once this is completed, the material can now be configured for in-game usage as usual. The filename of the backing image used will be displayed, but only for informational purposes.
From the Shader Editor Window
First, select the material that should be edited from the list at the header bar, or create a new one after adding a material slot from the slot list. There should be a Material Output output node and Principled BSDF shader node in the node setup. In the header bar, select Add (shortcut: Shift + a > Add) -> Texture -> Image Texture. This should add an Image Texture node at the cursor position, and while it can be placed anywhere, it should be placed somewhere where it doesn’t obstruct any existing nodes. The next two steps can be done in any order, but both must be done in order for configuration to be successful.
- Click on the image selector in this newly-created Image Texture node, and either use an already-loaded image or open another one. The filename of the backing image used will be displayed, but only for informational purposes.
- Connect this node’s Color output to the Principled BSDF’s Base Color input, and optionally do the same with the former’s Alpha output to the latter’s Alpha input. Doing this optional step alone will not do the same thing in-game, but it helps when previewing what an image texture with alpha will look like in-game.
Once these two steps are completed, the material can now be configured for in-game usage as usual. The filename of the backing image used will be displayed, but only for informational purposes.
Sources of Textures
The Media Repository
The SuperTuxKart media repository should be the first place you look for textures. They’re included in the game, so you don’t have to distribute copies with your object and they use advanced graphical effects like gloss and normal maps to take advantage of all the features of SuperTuxKart’s engine. They are in the textures folder. Simply choose one of these textures when you open an image in any of these locations (only in the UV/Image Editor window for Blender <= 2.79):
- The UV Editor window
- The Image Editor window
- Any Image Texture node
It is very important that the paths to the textures you use are correct in Blender, or no one will be able to understand your file. Always place your track’s files inside the media repository folder as if it were part of the core game. Additionally,
- Do not link to textures in stk-assets, only in stk_media_repo. There’s no guarantee that someone else has their stk-assets folder in the same place as you.
- Never pack textures into your Blender file.
- Never tell Blender to make file paths absolute. It will cause nothing but grief for anyone else who downloads and tries to open your file.
Don’t like the default color of the textures? No problem! Just use vertex coloring (see below). Vertex color lets you paint different colors on an object so that you don’t need a new texture. Gran Paradiso Island, for example, uses vertex color to make the sea floor greenish-blue, even though the original texture is a tan color rock texture.
Make sure you’re using the actual texture, not the gloss or normal map. Gloss maps are denoted by a filename ending with gloss, while normal maps are denoted by a filename ending with Normal.
Local Filesystem
If you will use a texture that is not shipped in the media repository, the process of selecting such an image file is the same. It is recommended that these textures be placed relative to the location of your Blender file (either in the same folder as that file, or in a folder in that same location), so that these textures will be displayed regardless of location, if these textures are also copied along with your Blender file. The texture guidelines should be used as usual.
Free Online Sources
There are many sources of free images that can be used as textures. Several are listed here. Just be sure they fit the texture guidelines.
Vertex Coloring
Vertex coloring lets you modify the color of objects by vertex. The coloring is then applied on top of any textures. (This is why we require most textures included in the game to be of a semi-neutral color) Vertex color is extremely efficient in terms of processing, and is a much better option in most cases than using a separate texture for gradients or using splatting. More information on how to apply vertex colors can be found by visiting the Blender manual.
Alternatively, a good video tutorial is available here, however the first part about materials is not relevant for STK.
Getting started
Select the object you want to color. In the ‘Properties’ window, under ‘Data’, click the plus button next to the box under ‘Vertex Colors’. Now, in the ‘3D View’ window header, switch to ‘Vertex Paint’ mode (rather than Object or Edit modes). Several new options will appear in the toolshelf at the left of the 3D View window. Alternatively, ‘Vertex Paint’ mode can be entered right away, in which a vertex color layer will be automatically created.
Painting
Choose a color with the color picker at the left, adjust the radius (size) of the brush, change the strength if you want to, and choose a blending mode (‘Mix’ is the default). Then, left-click on vertices to color them. You’ll notice that you can’t paint in the middle of a face. That’s because vertex coloring works per-vertex—you can’t assign colors to the middle of a face, because there’s no vertex to assign it to. It’s one of the limitations of vertex coloring, and you may have to work around it by using subdivision (shortcut: w > Subdivide) on a face.
Viewing your work in Object Mode
To preview how vertex colors when combined with an image texture would look like in-game, change the Viewport Settings to use ‘Material Preview’ mode. In addition, the shader node setup needs to be reworked to include a MixRGB node, where the ‘Color1’ input is the image texture, and the ‘Color2’ input is a vertex color node connected by its ‘Color’ output. This MixRGB node takes the place of the image texture node, connecting its ‘Color’ output to the ‘Base Color’ input of the Principled BSDF shader node.
For Blender <= 2.79, to make your painting visible in Object Mode when not in Textured view, enable ‘Textured Solid’ under ‘Shading’ in the ‘3D View’ window properties panel (shortcut: n).
Decals
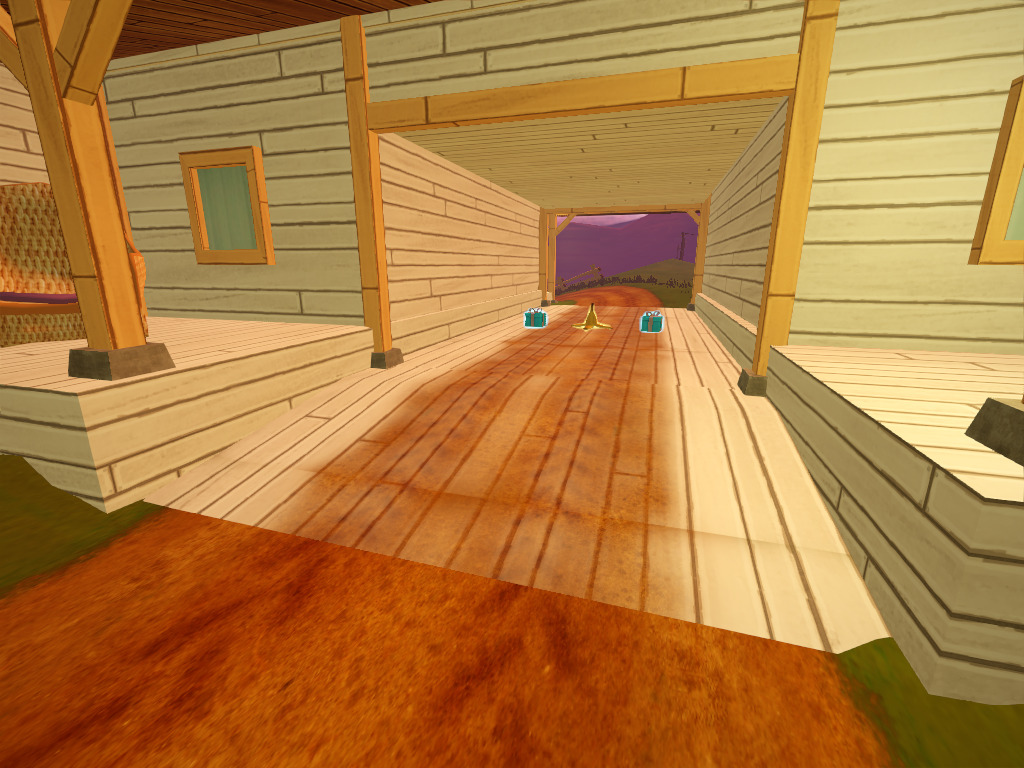
An example of a decal. The wooden texture uses the first UV map; the transparent dirt track texture uses the second UV map.
SuperTuxKart provides a “decal shader” which allows you to mix textures just like layers in a photo editing program. To use decals, first select the target mesh in Blender. In Blender’s ‘Properties’ window, under ‘Data’, click the ‘+’ button next to the box under ‘UV Maps’.
With the new UV map selected, switch to ‘Edit mode’ on the mesh and texture the object with the decal texture wherever you want. Be sure to select “Keep UV and edit mode mesh selection in sync” and only select faces you want to add the decal to. If you aren’t careful, the decal will tile all over the place.
Finally, to preview how this setup would look like in-game (for Blender >= 2.80), the shader node setup needs to be reworked to include a MixRGB node, where the ‘Color1’ input is the image texture for the first UV map, and the ‘Color2’ input is the image texture for the second UV map. In addition, the ‘Fac’ input should be connected to the ‘Alpha’ output of the image texture connected by the ‘Color2’ input. This MixRGB node takes the place of the image texture node for the first UV map, connecting its ‘Color’ output to the ‘Base Color’ input of the Principled BSDF shader node.
The decal shader does not work with textures that include a normal map.