Materials are a method of making textures simulate real-life… materials. A texture on a flat surface can give you the look of, for example, leather, but it can’t give you everything. What other properties does leather have? It’s shiny, but not reflective, and slightly bumpy. All these effects and more are controlled by the material.
Contents
- For Blender 2.80 and newer
- For Blender 2.63 to 2.79
- Shader
- Alpha Mask
- Colorization
- Backface Culling
- Texture Clamping
- Texture mirroring in reversed races
For Blender 2.80 and newer
The Blender material system is used to configure the appearance of image textures that can appear on meshes. Unlike older versions, usage of this node-based system is mandatory, but it is possible to get away from dealing with nodes if basic single-image configurations are all that is needed.
To learn more about how to use nodes, visit the Blender manual.
The full suite of shader nodes is currently unsupported (they are simply ignored in most cases); only a select few are recognized during the export process:
- Output - Material Output
- Shader - Principled BSDF
- Texture - Image Texture
- Color - MixRGB
- Vector - Normal Map
The following shader nodes are not actually used during the export process, but may help in previewing what a material will look like in-game:
- Input - UV Map, Vertex Color
For the Principled BSDF shader, the following inputs are recognized (other inputs are ignored):
- Base Color
- Metallic
- Specular
- Roughness
- Emission
- Alpha
- Normal
For the actual configuration of materials, the Antarctica/SuperTuxKart Properties panel contains all of the relevant options. It is located in the Material Properties section, but not in the same place for normal configuration of Blender materials. Configurations are stored on a per-material basis, rather than on a per-image basis as had happened in Blender <= 2.79. If an image is used in multiple materials, only one of these configurations will have any effect in-game. The material whose name ends with a later letter in A to Z manner is where the configuration will be taken from.
To preview how materials would look like in-game, change the Viewport Shading settings to use either Solid mode with the color set to Texture or Material Preview mode. The latter is preferred, as its appearance is generally closer to what is shown in-game, with the notable exception of when vertex colors and image textures are mixed together.
Several other features, including special effects and physics properties also piggyback on SuperTuxKart’s materials system. These reside in the Interaction section of the Antarctica/SuperTuxKart Properties panel, and are discussed in other articles. This article only discusses the Display section.
For Blender 2.63 to 2.79
It’s important to note at this point that we are not referring to Blender or Cycles materials (though in Blender 2.80 and later, these materials are used during the export process). These are ignored by SuperTuxKart. Instead, use our own materials system to apply materials to textures.
Several other features, including special effects and physics properties also piggyback on SuperTuxKart’s materials system. These reside in the Interaction section of the SuperTuxKart Image Properties panel (replaces every occurrence of the the Antarctica/SuperTuxKart Properties panel for this page), and are discussed in other articles. This article only discusses the ‘Display’ section.
Configuring Image Textures
If you used textures from the media repository, you don’t have to worry about materials. The materials are already configured in materials.xml in the textures folder of the stk-assets repository and will not be configurable through the Antarctica/SuperTuxKart Properties panel.
Textures not from the media repository will have to be configured in the Antarctica/SuperTuxKart Properties panel. There are several options to configure.
Shader
Shaders are little programs that control how things are rendered in the scene. They can do all sorts of things, so picking the right one is important. The shader is selected using the drop-down Shader menu in the ‘Display’ section of the Antarctica/SuperTuxKart Properties panel.
Generic (solid) Shader (PBR Solid)
This shader is used for most textures, and is the default option if no shader is explicitly selected. It supports a number of options to enhance the look of textures and is recommended for most special effects. However, alpha masks are unsupported. The solid shader also supports colorization (see Colorization below).
Texture
Gloss Map
Normal Map
Gloss Map
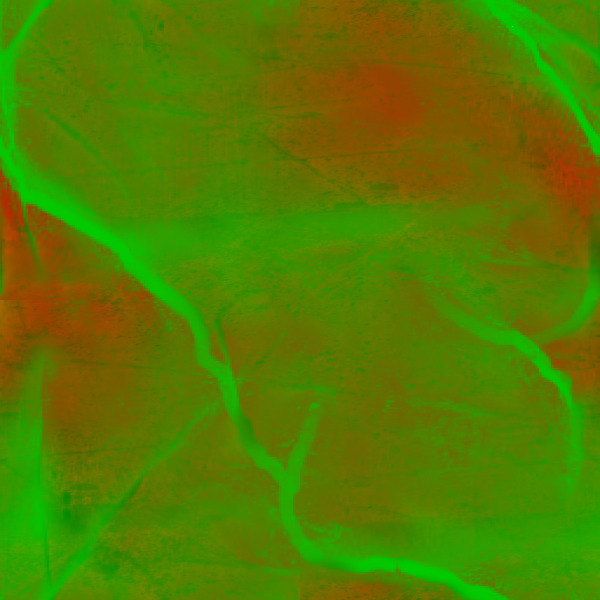
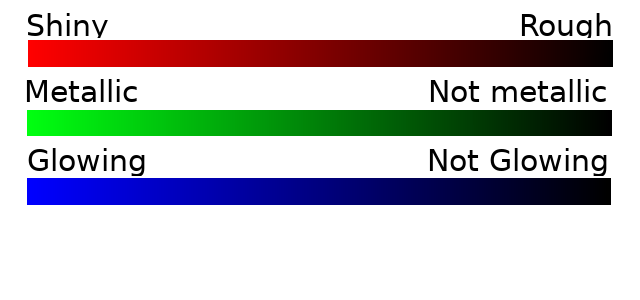
The gloss map is what lets you simulate a shiny surface. However, there are multiple factors to shininess. To take these all into account, the red, green, and blue channels of the gloss map image each correspond to a separate part. Making and testing a gloss map can be very time consuming, especially since you need to reload the game each time you try out a new gloss map. If you are good at Blender, however, you may find this useful.
- The red channel controls specularity. This is how concentrated the light is that reflects off the surface. At too high of a value, this has the effect of creating very bright dots on a very dark texture.
- The green channel controls metalness, ie: conductive and dielectric.
- The blue channel controls emission. The more blue present, the more the material will emit light. However, this light is only localized and does not brighten the surrounding area. Usually it’s used to make a fake glow effect on e.g. neon lights or lamps without the computational cost of a true point light.
If you have trouble with making your gloss map changes take effect in-game, try disabling texture compression in the game options.
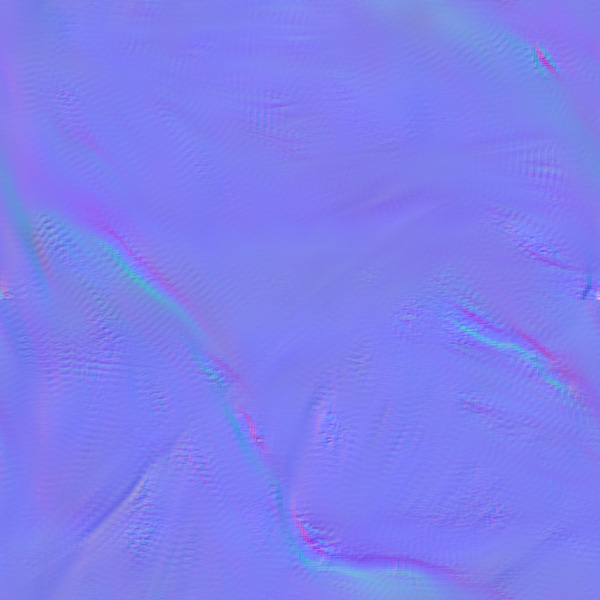
Normal Map
Normal maps allow you to reduce poly while still getting the cool visual effects of a bumpy or wavy surface. Many textures from the media repository already have normal maps, so you don’t need to create your own if you’re using textures from the media repository. (In fact, you can’t, although you may be able to help by making normal maps for textures that don’t have them.)
To apply a normal map, either enter the filename into the Normal Map box, or link a Normal Map node from its Normal output to the Normal input of the Principled BSDF shader node.
Creating the Normal Map
This tutorial assumes that your textures are square. It actually doesn’t matter if they aren’t, but you’ll have to do a little more work with editing the UV mapping and subdividing. Square textures work easily because a square plane will unwrap perfectly on top of them by default and a subdivide will create square quads which can correspond to pixels.
If the texture is, for example, 256 × 512, you will have to make the plane twice as long in a certain direction, with an edge in the middle so that when you perform subdivisions, you are subdividing squares.
Start in an empty Blender scene. Delete the default cube, light, and camera. Then, create a plane. In Edit Mode for the plane, with all four vertices selected, do a series subdivisions (shortcut: w > Subdivide) depending on the resolution . This might cause a bit of lag.
| Texture Resolution | Number of Subdivisions |
|---|---|
| 256 × 256 | 8 |
| 512 × 512 | 9 |
| 1024 × 1024 | 10 |
| 2048 × 2048 | 11 |
With all vertices selected, unwrap the the plane (shortcut: u > Unwrap). This will probably again cause some lag, but don’t worry. In the UV Editor window (UV/Image Editor window for Blender <= 2.79), you should see your plane.
Open the texture you want to create a normal map for, change the Viewport Settings to use either Solid mode with the color set to Texture or Material Preview mode. For Blender <= 2.79, enable Textured solid in the 3D View window properties panel (shortcut: n).
Now, switch the 3D View window to Sculpt Mode instead of Edit Mode. Several options will appear in the toolshelf at the left. Most important, however, is to turn off mirroring. To do this, deselect the “X” button below the “Mirror” section in the “Symmetry/Lock” section of the toolshelf.
Adjust the settings in the toolshelf for the sculpting brush as needed, and sculpt the plane in a way that you think would be realistic and fitting for the texture.
When you have finished sculpting, switch to Edit Mode, select all vertices, and, in the UV/Image Editor, click the “x” next to the texture filename to unlink the datablock.
Switch to object mode and create a new plane of exactly the same size and shape at exactly the same position as the one you sculpted.
Switch to Edit Mode, select all vertices of the flat plane, and unwrap it (shortcut: u > Unwrap). In the UV Editor window, click the “New” button to create a new image. Set the dimensions to the same as those of the original texture. Switch to Object Mode now; you should see that your flat plane is black if you have “Textured solid” enabled. Viewport Settings to use either Solid mode with the color set to Texture or Material Preview mode. For Blender <= 2.79, enable Textured solid in the 3D View window properties panel (shortcut: n).
It is very important that at some point you have selected all the vertices of the flat plane in edit mode and have the blank texture open in the UV Editor window. This assigns the texture as a face texture, which is needed for baking.
Remember how I said above to ignore Blender materials and the “Texture” section of the Properties window? Well, here’s a rare exception, because we’re using Blender’s own tools to create the normal map. Make sure that you have “Blender Render” selected as the rendering engine in the Info window. In the “Materials” section of the Properties window, with the flat plane selected, click the “New” button. Leave the settings as they are right now.
In the “Texture” section of the Properties window, with “material textures” selected, and still with the flat plane selected, click the “New” button. Set the following properties:
- Set the name of the texture to the same name that you gave your new blank image in the UV/Image editor.
- Make sure “Type” is set to “Image or Movie”.
- Under “Image,” click the photograph icon and select the new blank texture you just created.
- Under “Mapping,” set “Coordinates” to “UV.”
- Click in the “Map” field underneath “Mapping” and select “UVMap.”
Select the sculpted plane. Switch to the “Render” section of the Properties window. Under “Bake”, check “Selected to active.” Switch “Bake mode” from “Full Render” to “Normals.” Make sure “Bake from multires” is unchecked and “Normal Space” is set to “Tangent.”
Now, in object mode, first select the sculpted plane, then select the flat plane. Click the “Bake” button in the “Render” section of the Properties window. If you watch the blank image in the UV/Image editor, you’ll see Blender draw a lot of purple and blue.
To save the normal map, go to Image > Save As Image in the UV/Image Editor window. The normal map can now be applied.
Cutout Transparency (PBR Cutout Transparency (alpha test))
The cutout transparency shader is best for things like vegetation (when you do not want it to move—otherwise, use the vegetation shader). It performs “alpha testing”, to make pixels of a texture either 100% solid or 100% transparent. However, it doesn’t have all the features of the solid shader, so avoid using it for solid textures. If your texture is mostly solid with a few transparent sections, you should use a separate texture. Cutout transparency supports alpha masks and colorization; see Alpha Mask and Colorization below.
Blending Transparency ((NON PBR) Alpha See Through)
The blending transparency (“alpha blend”) shader is used for translucent textures, like windows. The colors of the objects seen through these textures will be blended with the colors of the translucent parts of the texture. Blending transparency supports alpha masks; see Alpha Mask below.
Blending transparency can only make objects darker, not lighter. Be aware that very darkly tinted transparent sections could greatly reduce the visibility of objects behind them.
Additive Transparency ((NON PBR) Alpha Additive)
The additive shader works the same way as the alpha blending shader, but instead of darkening colors when mixing, colors are lightened. This is useful for things like light beams or fire, to lighten objects behind the texture.
Unlit (solid) ((NON PBR) Unlit solid)
Textures using the unlit shader will always be at full brightness, in spite of lights or shadows. This shader does not support transparency.
Vegetation
The vegetation shader performs alpha testing, just like the cutout transparency. However, it additionally animates objects that have the texture applied, making them wave as if blowing in the wind. Using vertex painting, (see Texturing#Vertex Coloring for a tutorial) paint in black vertices to remain stationary, and leave white parts of the mesh that will wave. Paint vertices in shades of gray to make them move a shorter distance. The vegetation shader also provides two other options for control:
- Waving speed: How fast the vegetation will move back and forth
- Waving amplitude: The distance, in Blender units that the vegetation will wave
The vegetation shader supports colorization; see Colorization below.
Reflection (Sphere Mapping)
Warning! Deprecated! Don’t use this shader, use the solid shader with a gloss map instead!
This shader simulates a chrome appearance by simply reflecting anything nearby. Because of this, it is really not the most realistic and doesn’t provide all the details of the solid shader with a gloss map. However, if you’re desperate and don’t have a lot of time, you can use this shader to get an easy chrome effect.
Splatting
Splatting allows you to “draw” up to four textures together using another texture and mix the textures together, creating a smooth transition between different textures. However, it can be quite costly in terms of video RAM. If possible, consider vertex coloring first.
Creating a Fallback UV Map
Since splatting requires so much video RAM, it’s important to have a fallback for it for when players don’t have such graphical capabilities enabled. Mark any seams and unwrap your mesh. You can assign a different texture to each face to be able to at least show multiple textures, although this will not create a smooth transition.
To make painting the splatting map easier, be sure that you have not marked seams where you want a smooth transition with splatting enabled.
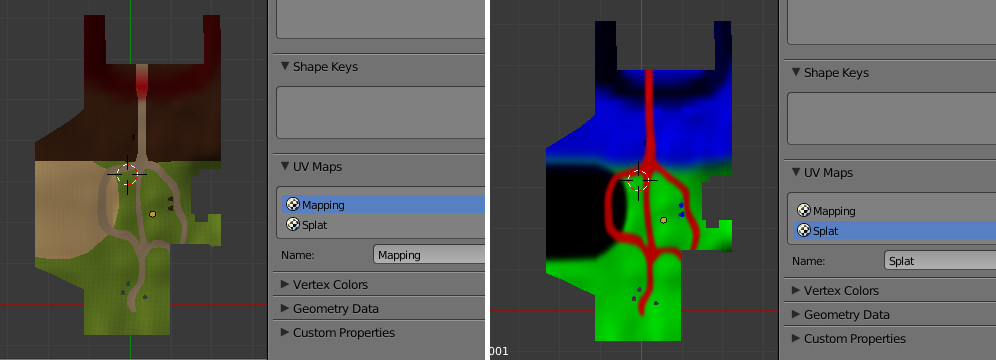
Creating a Splatting Map
Red, green, blue, and black will each correspond to a different texture. In the Properties window, under Data, under UV Maps, click the plus (+) button to add a new UV map. (Note that this UV map must be the second map listed. The first one should be the fallback.) Create a new image in the UV/Image Editor window.
Don’t try to change the UV coordinates for the second UV map—it won’t export. Instead, the splatting map will be simply assigned to the first UV map. This is because Irrlicht only supports one UV map per mesh.
Be sure to use as close to pure red (RGB 255, 0, 0) for red, RGB 0, 255, 0 for green, RGB 0, 0, 0 for black, etc. as possible. If you don’t use a pure color, other textures might be mixed in where you don’t want them.
Decide what colors you want to correspond red, green, blue, and black. Switch to Paint mode in the Image Editor window (UV/Image Editor for Blender <= 2.79) and select a color in the toolshelf (shortcut: t). You can also change various painting options for the brush in the toolshelf. Paint whatever pattern you want on the texture, blending colors wherever you want textures to be blended. If you have Textured solid enabled under Shading in the 3D View window properties panel (shortcut: n), you will be able to see your painting appear on the mesh in real-time.
Don’t forget to save your splatting map as a file! In the UV/Image Editor window, go to Image > Save as Image and put it in the same folder as your your .blend file.
Configuring Splatting Textures
Now you can assign textures to each color you painted on the splatting map. In the SuperTuxKart Image Properties panel, select your splatting map, and set the Shader property to Splatting (if you haven’t already). Set the names of texture files for the Red Texture, Green Texture, Blue Texture, and Black Texture properties.
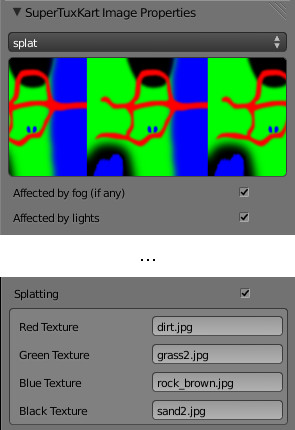
Some of the options that appear in this picture have changed since SuperTuxKart 0.9. You may disregard them; splatting configuration has not changed (though it is now enabled through the Shader menu).
Alpha Mask
Alpha masks allow for making a solid image transparent, either partially or fully. It is a grayscale image in which white represents full opacity and black represents full transparency. To make one, simply make a copy of your texture, use a tool like fuzzy select in GIMP or Krita to select a part that should be solid, and color it white, and select the parts that should be transparent and color them black. Use different shades of gray for different levels of translucency. Type its filename in the “Mask image” field for Alpha Test or Alpha Blending shaders in the SuperTuxKart Image Properties panel.
Texture
Alpha Mask
Colorization
Note: customizable colorizing currently is only available for library nodes! If your objects aren’t library nodes, you might want to consider vertex coloring.
Colorizing is a great way to reduce the need for multiple models of an object. Using a set of hues you provide, the shader can pick a random hue for each instance of a material, much like vertex coloring. However, colorizing can color each instance of a library node differently, while vertex coloring cannot.
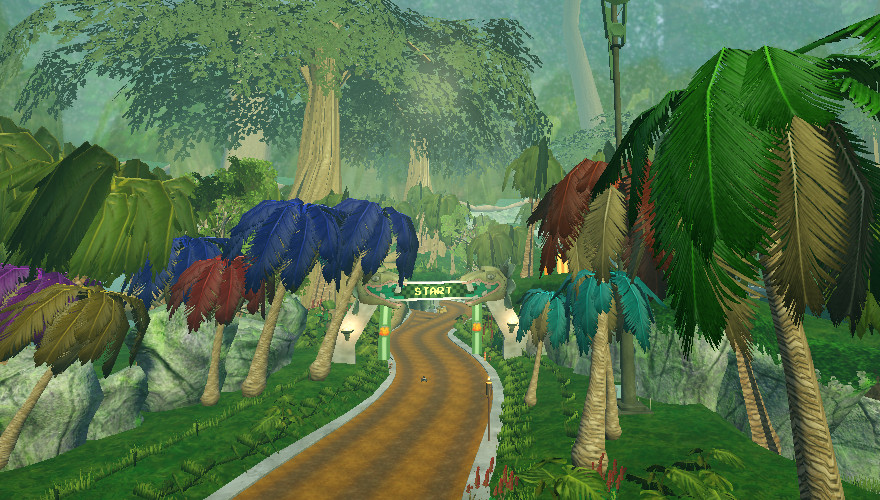
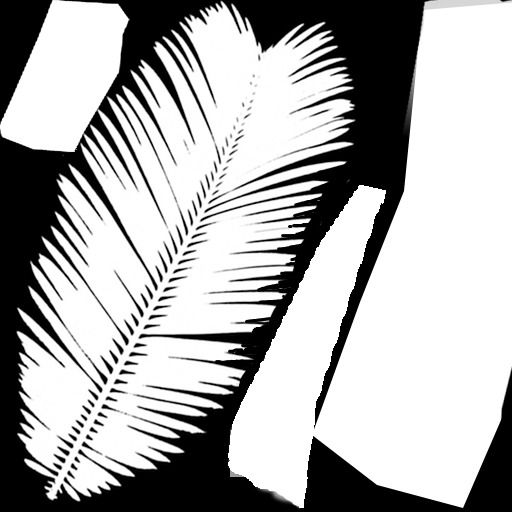
Adding variety to palm trees in Cocoa Temple
When we say “hue”, think “hue-saturation-value.” Hue does not mean the same thing as color in this case. Hue corresponds to the frequency of visible electromagnetic waves, or light. But hue in this case does not include saturation (the difference in strength between the various colors of light) or value (the total amount of light).
Colorizing is also used to mark teams in soccer and capture the flag mode. Karts on the “red” team will be colorized red, while karts on the “blue” team will be colorized blue.
To enable colorization for a material, check the “Colorizable” box in the SuperTuxKart Image Properties panel. This opens up three options:
- Colorization factor: This is the amount that the shader will increase saturation on colorized instances. This is useful for textures with low saturation, so that a change in hue will be noticeable enough.
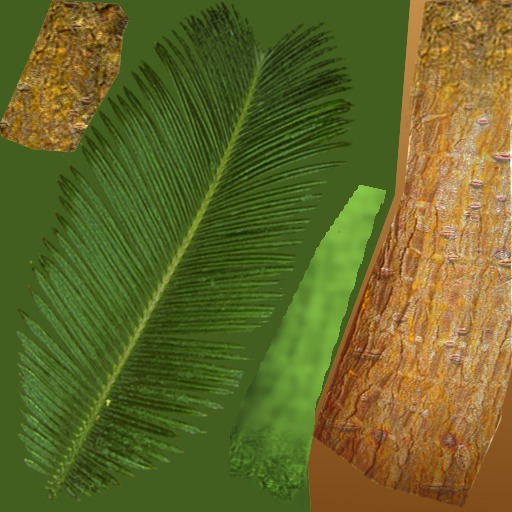
- Colorization mask: The colorization mask controls which parts of the texture will be colorized. Transparent sections will be colorized, while black sections will not be. (See images below.) As of STK 1.0, you can now simply use the alpha channel of your main texture for the colorization mask, since colorization only works with the generic solid shader anyway. Separate colorization masks are still supported, however, and may be easier to use.
- Hue settings for colorization: The numbers in this box control the hue palette the shader can pick from. Separate hues by spaces. A table of values is provided below for reference.
| Color | Hue value |
|---|---|
| Original hue | 0 |
| Red | 0.001 or 1.0 |
| Orange | 0.02 |
| Yellow | 0.1 |
| Green | 0.3 |
| Blue | 0.5 |
| Indigo | 0.66 |
| Violet | 0.8 |
Leave “Hue settings for colorization” empty on karts! Kart colorization is controlled by game modes with team and setting this property will cause problems!
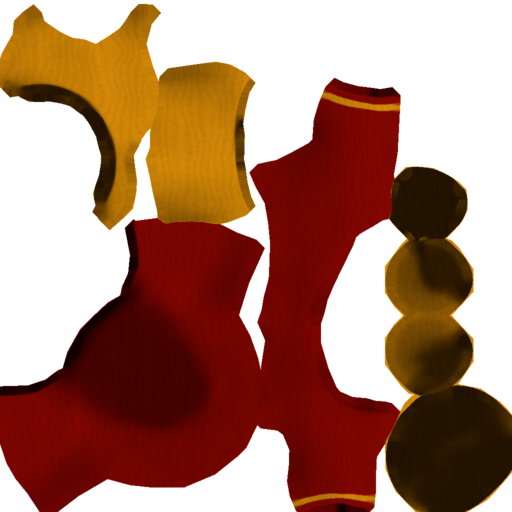
Texture for Gnu on his clothes

Colorization mask for Gnu clothes
Backface Culling
Backface culling makes planes only visible from one side—the side the normal is on. As of SuperTuxKart 0.9.0, this setting is generally no longer user-accessible. However, this setting can be previewed in Blender >= 2.80 by going to the ‘Material Properties’ section, then the ‘Settings’ section, and toggling ‘Backface Culling’. This setting is toggled on a per-material basis.
For Blender <= 2.79, this setting can instead be found in the right-hand pane in the 3D View window, in the ‘Shading’ section.
Texture Clamping
Texture clamping prevents textures from being repeated over an object. You can control this for both the U (horizontal) and V (Vertical) axes of the texture. Check either or both of the boxes
- Clamp texture horizontally
- Clamp texture vertically
in the SuperTuxKart Image Properties panel for your texture.
Texture mirroring in reversed races
You can set a texture to be mirrored when playing in reverse mode. This is useful for textures like arrows to show the way. Select one of the two options from the drop-down menu for the “Mirror in reversed races” option of the SuperTuxKart Image properties panel.