In SuperTuxKart, most modifications to standard physics are controlled per-texture. Textures in the media repository are already configured for physics via materials.xml in the textures folder of the stk-assets repository. See the Materials xml page for information on understanding the file.
Any textures in the gfx folder in the textures folder of the media repository with the suffix “AlphaTest” or “AlphaTested” will not appear in-game. For more information, see the Media Repo page.
Where to configure these physics properties depends on the Blender version being used. For Blender 2.80+, they are located in the Antarctica/SuperTuxKart Properties panel, which in turn is located in the Material Properties section of the Properties window. For Blender <= 2.79, they are located in the SuperTuxKart Image Properties panel, which in turn is located in the Scene section of the Properties window. The rest of this page assumes the usage of the Antarctica/SuperTuxKart Properties panel.
Contents
- Zippers (Speed Booosters)
- Magnet Sections
- Reset (Rescue) Player
- Traction, Collision, and Friction
- Normals Smoothing
- Kart-Object Interaction
- Cannons
Zippers (Speed Booosters)
If you have your own texture for zippers, or you will be using a texture from the media repository that is not configured as a zipper, you can use gfx_booster_AlphaTest.png as a texture wherever you want a zipper.
A favorite method of our lead artist, Jean-Manuel Clémençon, is to use a a checkerboard texture from the textures/flags folder of the media repository, in conjunction with an arrow texture from the same folder to denote a zipper. gfx_booster_AlphaTest.png serves as the actual zipper texture, in a section of the mesh slightly above the checkered texture. The arrow texture is in a section of the mesh between the checkerboard and the zipper texture. Usually, he makes the arrow texture animated and adds point lights above the booster, too.
You can also use your own textures for zippers, by selecting your texture in the SuperTuxKart Image Properties panel, and, under “Interaction”, checking the box “Zipper (speed boost)”. This allows you to modify the following options:
- Zipper duration: The time, in seconds, that the speed boost will last. If this value is negative, the kart-specific value will be used.
- Zipper max speed increase: Additional speed allowed on top of the kart-specific maximum kart speed if a zipper is used. If this value is negative, the kart-specific value will be used.
- Zipper fade out time: The time it takes for a kart to slow down to normal top speed after using a zipper. If this value is negative, the kart-specific value will be used.
- Zipper speed gain: A one time additional speed gain—the kart will instantly add this amount of speed to its current speed. If this value is negative, the kart-specific value will be used.
- Zipper minimum speed: Set a minimum speed for karts launched from the zipper (e.g. for jumps). If this value is negative, no minimum speed will be set.
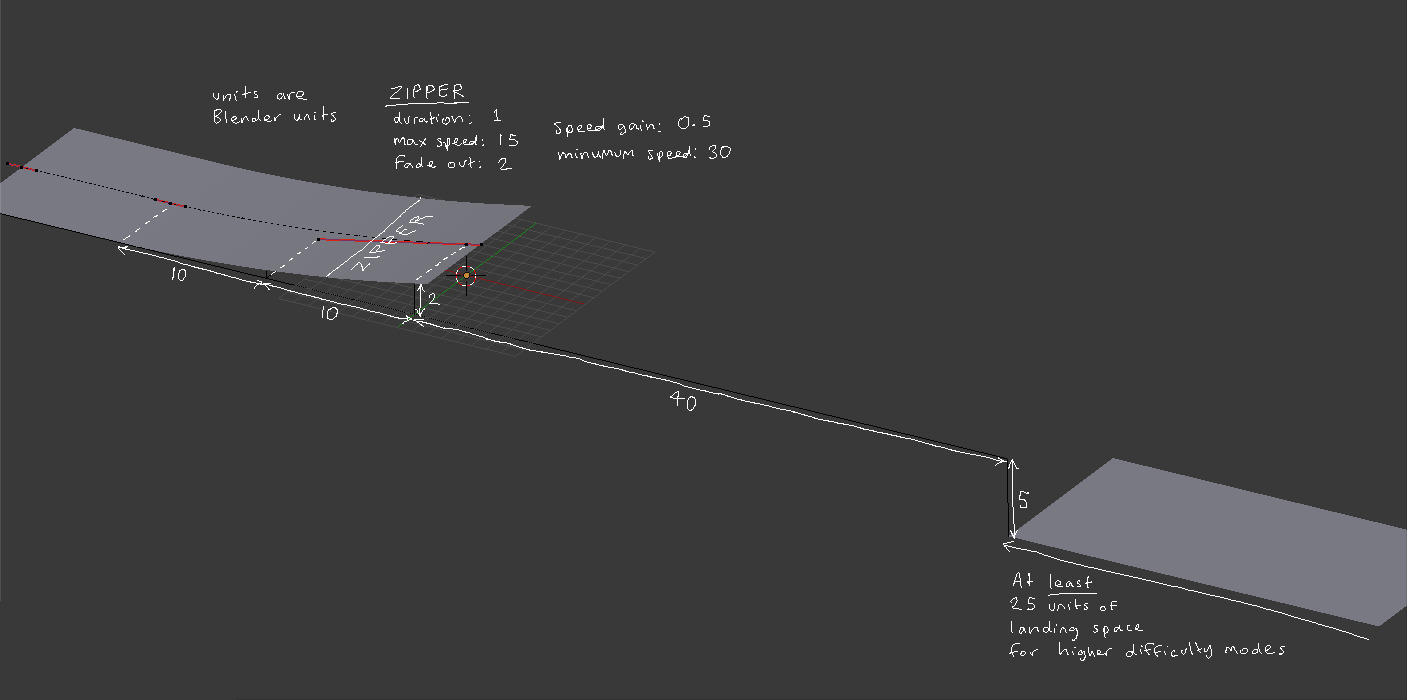
Tuning Zippers
It’s very difficult to make zippers exactly how you want, but this guide from OzoneOne should help.
- Space the jump so that there is a large landing area suitable for the high speeds of SuperTux mode.
- Decrease the Zipper speed gain property to something very small, like 0.5. This results in only a minor boost in SuperTux mode, so that players do not completely overshoot the jump.
- Set the Zipper minimum speed property to a value high enough for the player to get over the jump on any difficulty from novice to SuperTux.
Magnet Sections
Magnet sections allow karts to drive on any surface, no matter what its orientation. This allows karts to drive on walls, roofs, etc. Magnet sections are controlled per-texture, so simply select the texture used on the angled or upside-down part of your track in the Antarctica/SuperTuxKart Properties panel, and, under “Interaction”, check the “Affect gravity” box.
Many textures in the media repository are also configured to be magnet sections. Check the Materials.xml file in the textures folder of the stk-assets repository.
Reset (Rescue) Player
Resetting the player returns them to the track. Players who fall into the abyss will be automatically rescued, but to make the track more enjoyable, be sure to have some system for resetting players who go far off the track. However, do not immediately rescue any kart that goes off the road. Use other methods, like a slowdown effect, to keep players on the road.
On Drive
You can set a texture to reset the player whenever they drive on it. To do so, select a material first, then in the Antarctica/SuperTuxKart Properties panel under “Interaction”, check the “Reset kart (on drive)” box.
On Collision (Per-Texture)
Select a material first, then in the Antarctica/SuperTuxKart Properties panel under “Interaction”, check the “Collision action” checkbox. In the “Action” menu, select “Rescue kart”.
Rescuing the player upon collision with an object is discussed in the Kart-Object Interaction section below.
Traction, Collision, and Friction
Select any material, then in the SuperTuxKart Image Properties panel under “Interaction”, check any of the following boxes:
- Enable Slowdown: Slow down any karts that drive on this texture; useful for textures that are off the main road
- High tires adhesion: Give karts extra grip on this texture
- Ignore (ghost material): The texture is still visible, but karts can drive through it as if it doesn’t exist
Force fields
To enable a force field-like effect on a material, you can check the “Collision action” checkbox and set “Action” to “Push back kart.” The translucent spheres in the overworld (challenge selection) use this to prevent you from entering locked challenges.
Normals Smoothing
Normals smoothing allows for smoother driving by interpolating normals, imaginary lines perpendicular to surfaces. This allows for tracks to be smoother in the physics engine without increasing polycount for the track in the graphical engine. However, because normals have to be interpolated, this can cause problems when the object being driven on is not separate from the walls. You should use it with caution.
To enable normals smoothing, check the “Smooth Normals” box in the SuperTuxKart Scene Properties panel.
Kart-Object Interaction
Making objects interactive makes your track more interesting. Some things are only possible with scripting, which is covered in a future module, but for basic interaction a few actions can be easily set.
Select an object in Blender’s 3D View window, then, in the SuperTuxKart Object Properties panel, give the object the type “Object”, “LOD Instance”, or “LOD Standalone” (depending on if you are using LOD for that object). The “Interaction” menu has several options:
All interaction types except for “Ghost” allow for configuring the Shape property. This is used for animated objects, but applies to all objects that are not exported as part of the main track. Choose a shape carefully or set “Interaction” to “Ghost”, otherwise you might end up with invisible barriers in your track. (See Animating Decorations))
- Ghost: The object is visible, but karts drive through it as if it does not exist. This can be applied to many objects to reduce load on the physics engine.
- Static (won’t move): This is the default option. The object cannot be moved by karts.
- Movable by player: Karts can push this object around; ideal for road cones or balls. However, they may NOT have IPO animation (it wouldn’t make sense anyway). This also creates a new option:
- Mass (kg): The heavier an object is, the harder it will be for a kart to push it. A medium-weight kart is 225 kg. The beach balls in Gran Paradiso Island are an unrealistic 5 kg.
- Reset player: The kart will be reset back to the track upon collision with this object.
- Knock player: The kart will be thrown into the air upon collision with this object, like being hit with a bowling ball.
- Flatten player: The kart will be flattened, like being hit with a fly swatter.
The Object type also features an interaction option which LOD Instance and LOD Standalone lack: “Physics only”. This is the opposite of “Ghost”—the object will be invisible, but can still be collided with by karts.
Cannons
Cannons allow you to launch karts long distances without the unreliability of zippers. It simulates being shot through a cannon.
To make a cannon, first make a line with two points where you want the cannon to start. When a kart drives over this line, it will be shot by the cannon. Next make a Bézier curve with its beginning near the cannon start line, and its ending near where you want the karts to land. The karts will follow this path during their flight from the cannon. Finally, make another line with two points near the end of the Bézier curve. This is where the karts will actually end.
Try to make the start and end lines approximately perpendicular to the Bézier curve. This will result in a more smooth transition from driving to flight. If you rotate or scale them in object mode, be sure to go to Object > Apply > Rotation & Scale in the 3D View window menu.
Give the second line the type “Cannon End” in the SuperTuxKart Object Properties panel. (Note: You do not need to give the Bézier curve a special object type.) Give the first line the type “Cannon Start”. This opens up the following options in the SuperTuxKart Object Properties panel for the cannon start line:
- Flight end line: Use the drop-down menu to select the cannon end line you created above.
- Path: Use the drop-down menu to select the Bézier curve you created above.
- Speed: This is the speed of the kart. For long distances, make sure the kart travels quickly.
Make sure the driveline or navmesh includes the cannon start line and the flight path!