Karts can have a number of attachments to achieve special effects. This page describes how to add them to your kart.
Contents
Nitro/Exhaust emitter
Add Blender empty-type objects at the ends of the exhaust pipes on your kart and set the type to “Nitro Emitter” in the SuperTuxKart Object Properties panel.
Headlights
All new karts should have headlights of some sort unless it absolutely makes no sense for your kart. This doesn’t mean you have to use traditional headlights—Gnu, for example, bears antique oil lanterns instead of normal headlights, which wouldn’t go well with a flying carpet.
For most karts, with the exception of Gnu, the headlights are integrated into the kart model and the object specifically marked as a headlight in Blender is actually a fake light cone, since SuperTuxKart does not support real cone lights.
To add headlights, you can copy the light cone from one of the other karts in the media repo and add it to your kart where you want it. Be sure to apply the any rotation and scaling you make in object mode with Ctrl+A. You can duplicate this mesh in object mode with Shift+D. The origin of the headlight (the small yellow dot) will be the location of the actual light on the kart. You can change the origin with Ctrl+Alt+Shift+C. From here, there are two courses of action depending on the design of your kart:
If your headlights are attached to the character or an animated kart
Probably most karts will not need this special procedure. Provided that the headlights are attached to the kart and the kart does not have any special skeletal animations, the headlights will not become visibly “detached” from the kart. If, however, your kart uses special animations like Pepper’s broom, you will need this procedure. Most karts lean when turning via STK’s built-in IPO animation which will automatically move headlights too, but for Pepper, the broom has its own skeletal leaning animation in addition to this. Thus, if the headlight is not attached to the broom, it will become separated when turning and look ugly. The solution to this is to attach the headlight to a bone.
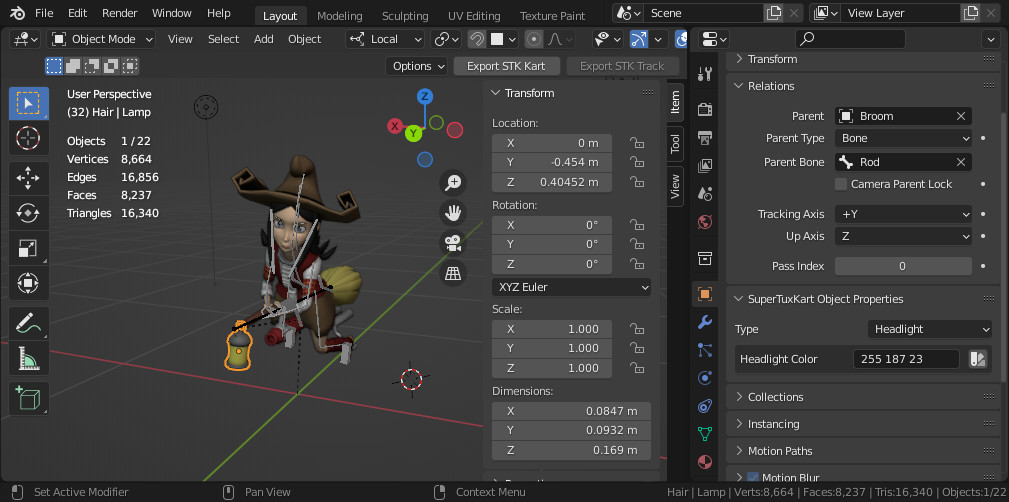
Select the first headlight you would like to attach, make it a a child object of the armature which it should follow, then go to the Object section of the Properties window, choose “Bone” for Parent Type and select the bone it should follow immediately below, as shown in the screenshot above. Then, in the SuperTuxKart Object Properties panel, set the headlight object as a “Headlight” object type. You can also set the color of the light emitted.
If your headlights are static (non-moving)
If your headlights don’t need to move besides normal tilting of the kart (which is handled by STK in code), it is much simpler to add headlights. All that’s needed is to position the light cone where you want it and mark it as a headlight in the SuperTuxKart Object Properties panel. You can also choose a color of the light emitted.
Cut down on resource costs! If you use the same model for both headlights on your kart, make a linked copy with Alt+D instead of Shift+D and your headlight object will use instancing.
Christmas Hats & Easter Bunny Ears
Hats are added in a way very similar to headlights. Create an object (any object, though appending christmas_hat.blend from the models folder of the media repo is recommended) and position it where you want your hat to be relative to the character. Set it as a “Hat Positioner” in the SuperTuxKart Object Properties panel. Then, if and only if your character has skeletal animation, make the hat object a child object of your character model, change Parent Type to “Bone” under “Relations” in Blender’s Object Properties panel, and choose the correct bone (probably your character’s neck or head bone) to attach the hat via Parent Bone chooser.

You can also save a small amount of space in your blend file by linking the hat model instead of appending and, with the model selected, going to Object > Make Local > Selected Object and Data in the 3D View window.
Speed-Weighted Animations
SuperTuxKart can change the speed of skeletal and/or texture animations on certain objects depending on the speed of the kart. For example, this is used for the Sara’s snowmobile to make the continuous track speed up and slow down with the kart. Adding speed-weighted objects is quite easy, provided the object to be speed-weighted is a separate object and not part of the same mesh as the kart.
A speed-weighted animation can be added to an object simply by setting its type to “Speed Weighted” in the SuperTuxKart Object Properties panel. The tooltips on the settings that appear beneath explain what each setting does. Note the following regarding each setting:
- Strength factor has no effect on most devices. Essentially this only has an effect with the Intel HD Graphics 3000 on Windows, where hardware skinning is not supported.
- Speed factor will use the default value if set to
-1.0. It will not be completely disabled. If you want speed-independent skeletal animation but speed-dependent texture animation, set this option to0.0 - Texture speed X and Texture speed Y must both be set to
0.0if you wish to disable texture animation.
If you add a skeletally-animated speed-weighted object, and wish to attach it to a bone as in the hat procedure above, you will need to animate the object separately in local space, making sure that the armature and the object it deforms have the same center of mass. Then make the armature and the object direct children of your main armature (for Kiki, the tail armature is a child object of the body armature). The speed-weighted object and its armature should have a sibling relationship, not parent-child.